> ## Documentation Index
> Fetch the complete documentation index at: https://ago.mintlify.site/llms.txt
> Use this file to discover all available pages before exploring further.
# Widget & SDK Authentication
> Authenticate users in embedded widget and SDK API contexts
This document describes the widget authentication system that allows the AGO frontend to work correctly when
embedded as a widget in third-party websites. The same authentication mechanism is also used by the
[SDK API](/api/sdk-api) for building custom chat interfaces.
## Overview
The widget authentication system enables the AGO application to authenticate users automatically when running in
embed mode (widget context) or via the SDK API, without requiring traditional login flows. This is achieved through:
1. **Anonymous user ID**: A unique identifier for each end user, sent as the `X-User-Anon-Id` header (`X-Widget-Id` is the legacy name and still accepted)
2. **Allowed Domains**: The request origin is validated against your allowed domains list
3. **JWT Token (Optional)**: For authenticated user sessions with custom claims
4. **Automatic User Creation**: Backend automatically creates users for widget/SDK sessions
## Usage
### Embedding the Widget
```html theme={null}
My Website
Welcome to My Website
```
### Anonymous Access
For anonymous user sessions, no extra configuration is needed. The backend creates a unique user for each widget
instance based on a generated user ID inside the widget iframe.
To help identify users across sessions, we store this ID in `localStorage` under the key `ago-widget-id`.
We can define in the admin, different permissions based on if the user is anonymous or authenticated via JWT.
### Using JWT Authentication
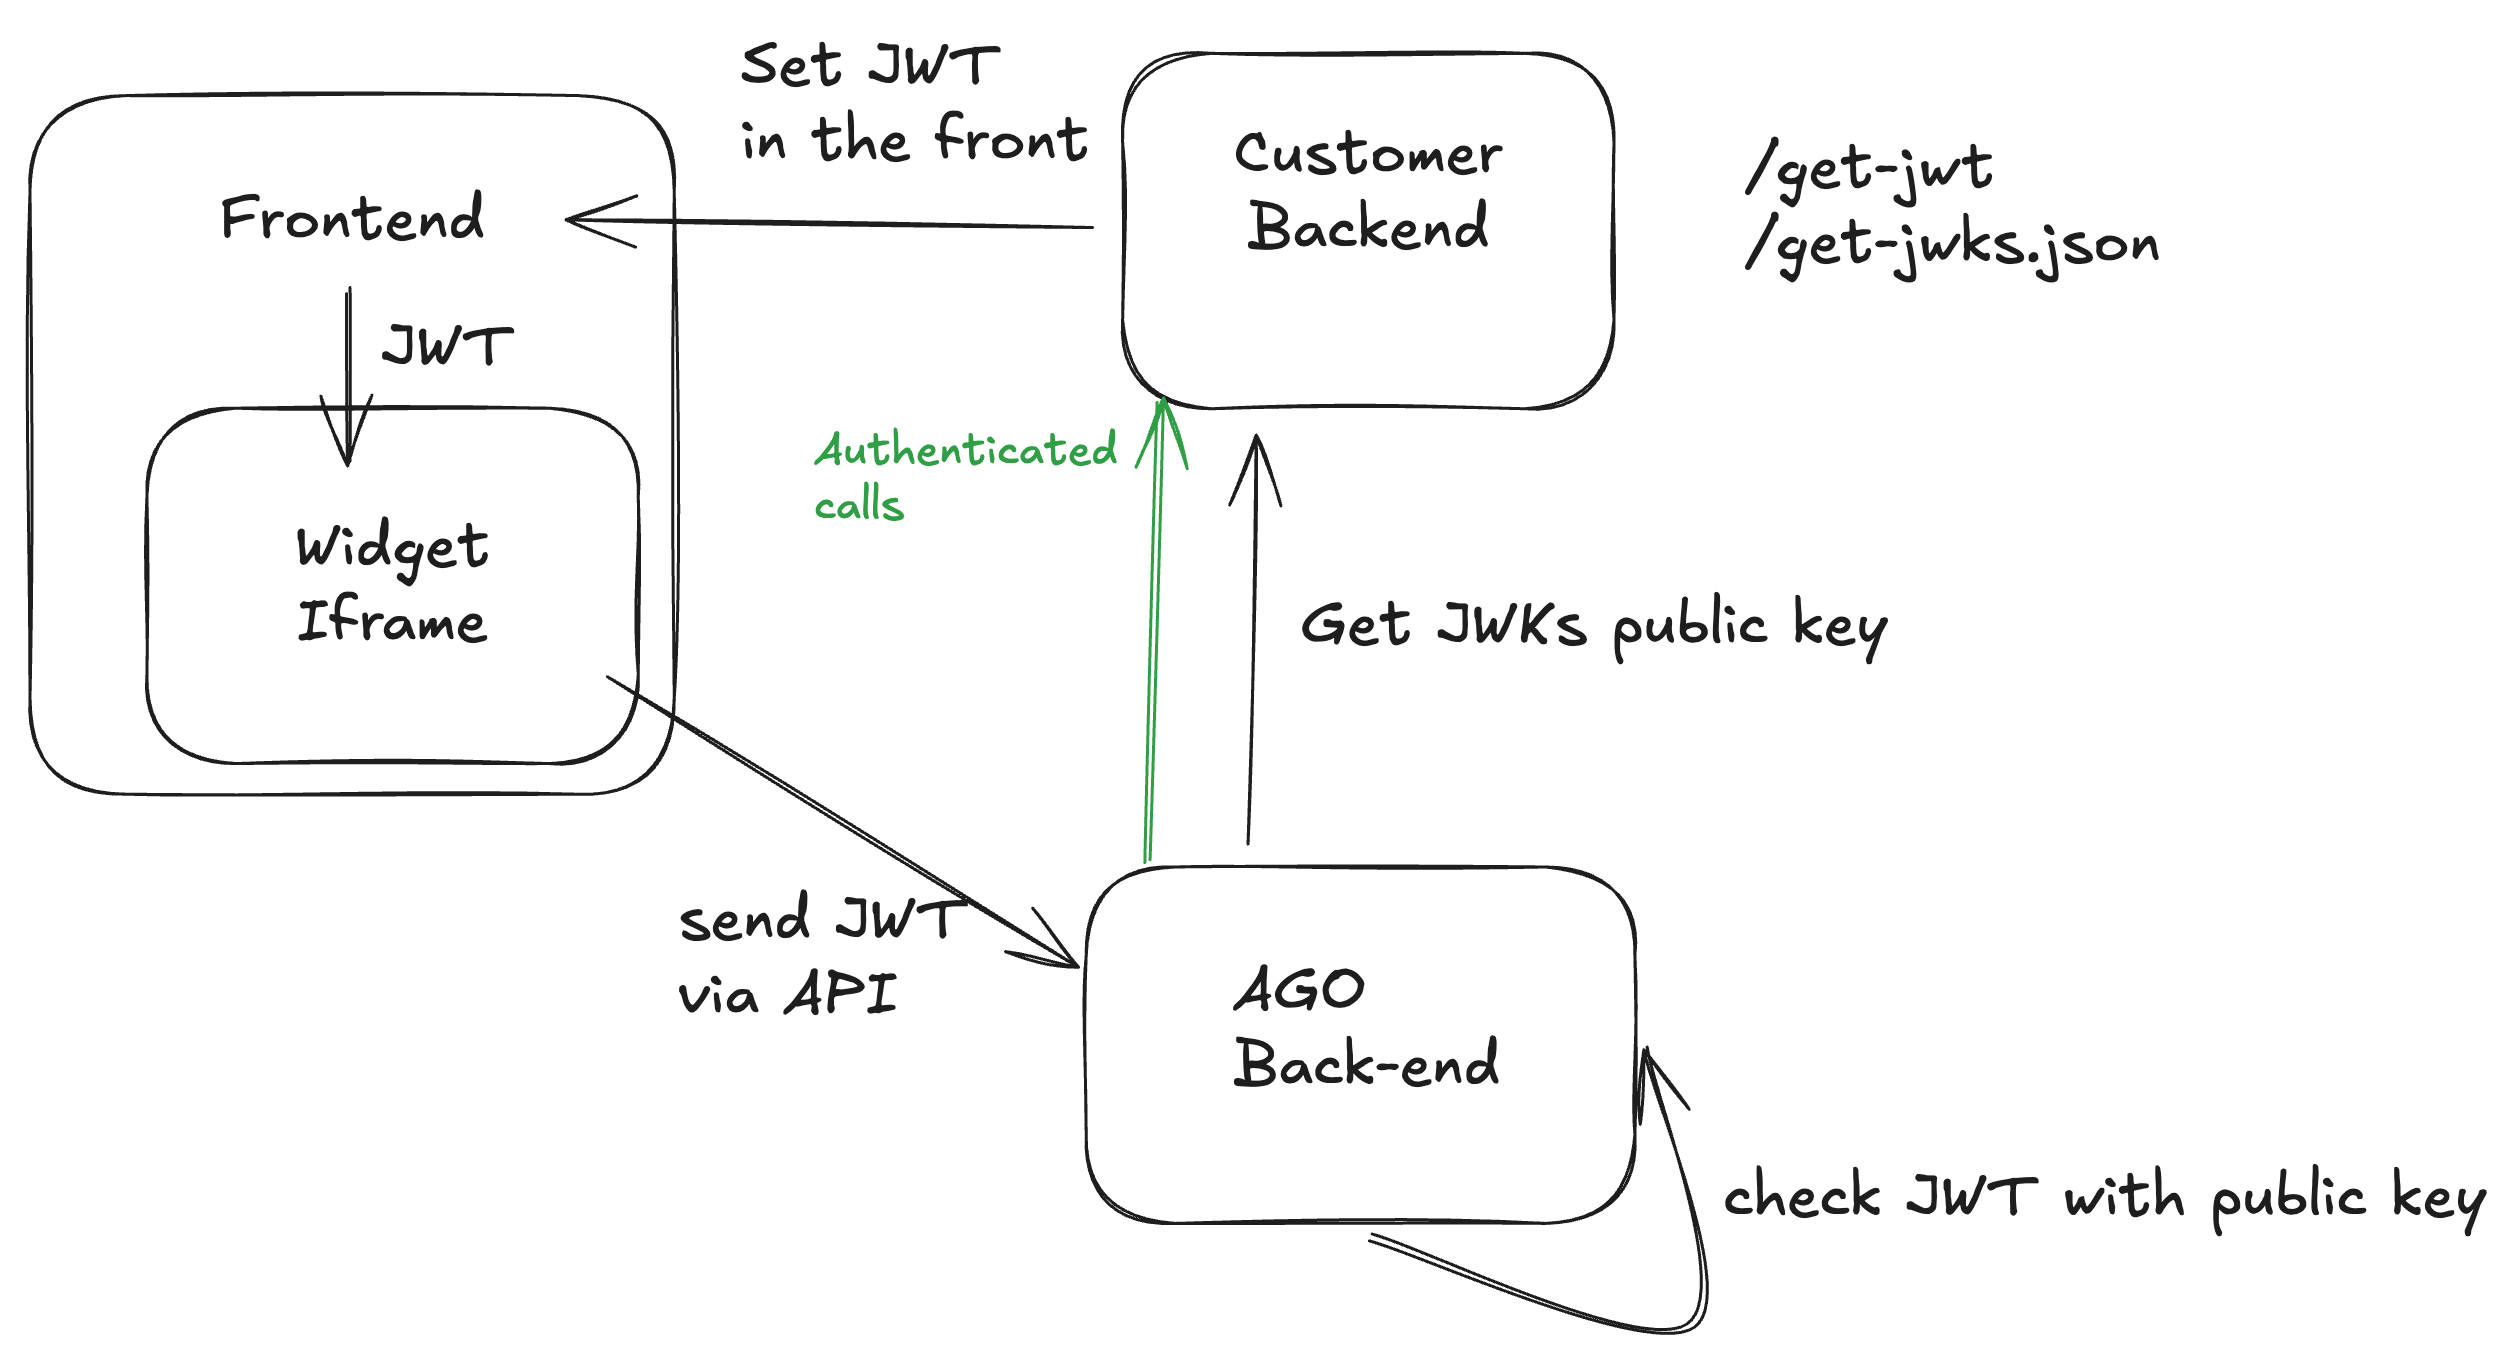
For authenticated user sessions, you can provide a JWT token:
```javascript theme={null}
window.AGO = {
basepath: 'https://your-instance.example.com/',
jwt: 'eyJhbGciOiJFUzI1NiIsInR5cCI6IkpXVCJ9...'
};
```
The JWT will be used in the widget and be sent with the `Authorization: Bearer ` header on all API requests.
 **Backend Configuration**
Widget authentication is configured through backend settings:
* **Widget allowed domains**: The list of origins allowed to embed the widget and call the API
* **Widget JWT JWKS URL**: Required for JWT authentication. This URL should point to your JSON Web Key Set (JWKS)
endpoint that provides the public keys used to verify JWT signatures. Without this configuration, JWT authentication
will not work.
### API Request Flow
When the widget or SDK makes API requests, the following headers are sent:
```
X-User-Anon-Id: generated-uuid
Origin: https://your-website.com
Content-Type: application/json
Authorization: Bearer (optional, if JWT is configured)
```
`X-Widget-Id` is the legacy name for the `X-User-Anon-Id` header and is still accepted.
On the SDK API, the `X-User-Anon-Id` header is optional when a JWT is sent: the user identity is then taken
from the token's `sub` claim, so `Authorization: Bearer ` alone is enough.
The backend validates each request by:
1. Validating the request origin against your allowed domains list
2. Verifying the JWT signature if a token is provided (using your configured JWKS URL)
3. Creating or retrieving a user based on the user ID or JWT claims
## Security Considerations
### Domain Restrictions
* Add only the domains that should be allowed to embed the widget to the allowed domains list
* The request origin is checked against your allowed domains list before a session is created
## Troubleshooting
### Common Issues
1. **Widget authentication fails**
* Check that origin is in allowed domains list
* Ensure the `X-User-Anon-Id` (or legacy `X-Widget-Id`) header is present, or that a JWT is sent on the SDK API
2. **JWT validation fails**
* Verify JWT signature and expiration
* Ensure public keys are configured in backend
* Check JWT claims match expected format
**Backend Configuration**
Widget authentication is configured through backend settings:
* **Widget allowed domains**: The list of origins allowed to embed the widget and call the API
* **Widget JWT JWKS URL**: Required for JWT authentication. This URL should point to your JSON Web Key Set (JWKS)
endpoint that provides the public keys used to verify JWT signatures. Without this configuration, JWT authentication
will not work.
### API Request Flow
When the widget or SDK makes API requests, the following headers are sent:
```
X-User-Anon-Id: generated-uuid
Origin: https://your-website.com
Content-Type: application/json
Authorization: Bearer (optional, if JWT is configured)
```
`X-Widget-Id` is the legacy name for the `X-User-Anon-Id` header and is still accepted.
On the SDK API, the `X-User-Anon-Id` header is optional when a JWT is sent: the user identity is then taken
from the token's `sub` claim, so `Authorization: Bearer ` alone is enough.
The backend validates each request by:
1. Validating the request origin against your allowed domains list
2. Verifying the JWT signature if a token is provided (using your configured JWKS URL)
3. Creating or retrieving a user based on the user ID or JWT claims
## Security Considerations
### Domain Restrictions
* Add only the domains that should be allowed to embed the widget to the allowed domains list
* The request origin is checked against your allowed domains list before a session is created
## Troubleshooting
### Common Issues
1. **Widget authentication fails**
* Check that origin is in allowed domains list
* Ensure the `X-User-Anon-Id` (or legacy `X-Widget-Id`) header is present, or that a JWT is sent on the SDK API
2. **JWT validation fails**
* Verify JWT signature and expiration
* Ensure public keys are configured in backend
* Check JWT claims match expected format