> ## Documentation Index
> Fetch the complete documentation index at: https://ago.mintlify.site/llms.txt
> Use this file to discover all available pages before exploring further.
# Widget & SDK Configuration
> Manage widget embedding and SDK API access for AGO
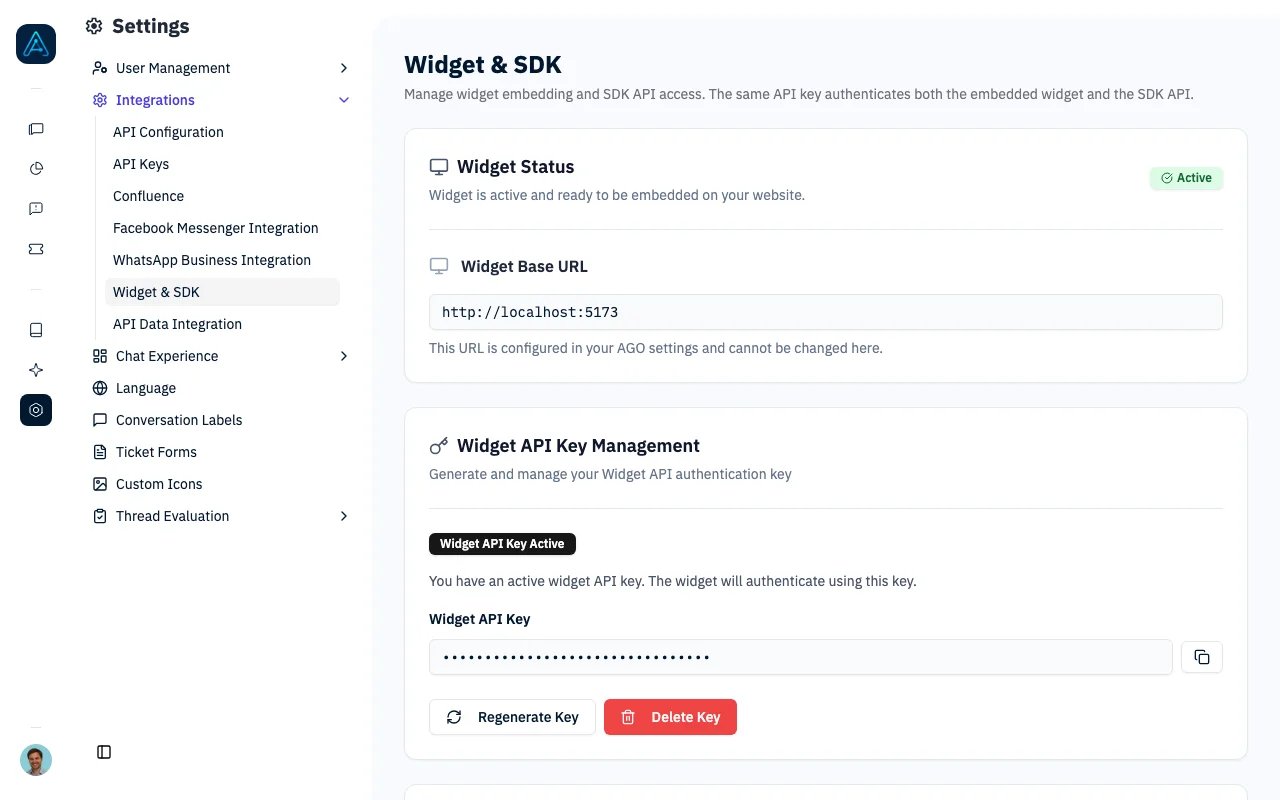 The Widget & SDK Configuration page allows administrators to manage the AGO widget that can be embedded on external
websites, as well as the SDK API for building custom chat interfaces. Both channels share the same authentication
mechanism: requests are tied to a widget ID and validated against your allowed domains list.
## Accessing Widget & SDK Configuration
Navigate to **Settings → Integrations → Widget & SDK** in the admin panel.
## Features
### Widget Security Settings
#### JWT JWKS URL (Optional)
Configure JWT authentication for added security:
* Set the JWKS URL for JWT token verification
* Leave empty if not using JWT authentication
* Example: `https://your-domain.com/.well-known/jwks.json`
#### JWT Fields Mapping (Optional)
Extract additional information from JWT tokens and include it in ticket private comments:
* Configure which JWT claims to extract and their display labels
* Supports nested fields using dot notation (e.g., `user.department`)
* Extracted fields are automatically added to private comments when tickets are created
* Works with both Zendesk and HelpScout ticketing systems
* Leave empty if no JWT field extraction is needed
**Configuration Format** (JSON array):
```json theme={null}
[
{"jwt_field": "department", "label": "Department"},
{"jwt_field": "employee_id", "label": "Employee ID"},
{"jwt_field": "user.role", "label": "User Role"}
]
```
**Field Mapping Object Structure**:
* `jwt_field` (required): The name of the JWT claim to extract. Supports dot notation for nested fields.
* `label` (required): The display name that will appear in the ticket private comment.
* `ago_field` (optional): Binds the extracted value to a canonical AGO field that can trigger business rules (for example, `zendesk_create_or_update_organization_external_id`).
**How It Works**:
1. When a user authenticates with a JWT token, the system extracts the configured fields from the token
2. Extracted values are stored with the user session
3. When a ticket is created, the extracted fields are automatically appended to the ticket's private comment
4. The private comment will contain each field formatted as: `Label: value`
**Example Use Cases**:
* Track department or team information for internal support
* Include employee/customer IDs for enterprise applications
* Add custom metadata from your authentication system
* Maintain audit trail with user context information
**Supported Field Types**:
* String values (e.g., "IT Department")
* Numeric values (e.g., 12345)
* Boolean values (e.g., true/false)
* Nested objects using dot notation (e.g., `user.profile.department`)
**Example JWT Token**:
```json theme={null}
{
"sub": "user123",
"email": "user@example.com",
"department": "IT",
"employee_id": "EMP123",
"user": {
"role": "admin",
"team": "Engineering"
}
}
```
**Example Configuration**:
```json theme={null}
[
{"jwt_field": "department", "label": "Department"},
{"jwt_field": "employee_id", "label": "Employee ID"},
{"jwt_field": "user.role", "label": "User Role"},
{"jwt_field": "user.team", "label": "Team"}
]
```
**Result in Ticket Private Comment**:
```
Department: IT
Employee ID: EMP123
User Role: admin
Team: Engineering
```
#### Metadata Fields Mapping (Optional)
Extract additional information from widget metadata (sent via `sendMetadataToAGO()`) and include it in ticket private comments:
* Configure which metadata fields to extract and their display labels
* Supports nested fields using dot notation
* Extracted fields are added to private comments when tickets are created
* JWT values take precedence over metadata values when both map to the same AGO field
**Field Mapping Object Structure**:
* `metadata_field` (required): The name of the metadata property to extract. Supports dot notation for nested fields.
* `label` (required): The display name that will appear in the ticket private comment.
* `ago_field` (optional): Binds the extracted value to a canonical AGO field that can trigger business rules.
**Example Configuration**:
```json theme={null}
[
{"metadata_field": "orderId", "label": "Order ID"},
{"metadata_field": "plan", "label": "Plan"},
{"metadata_field": "userId", "label": "User ID", "ago_field": "zendesk_create_or_update_organization_external_id"}
]
```
#### Prefill Zendesk Ticket Fields from Metadata
Use the `zendesk_prefill_ticket_field_` AGO field to populate a Zendesk custom field on ticket creation with a value coming from JWT claims or widget metadata. Replace `` with the numeric ID of the target Zendesk ticket field.
Values resolved from JWT take precedence over widget metadata. If the end user also sets the same field through the ticket form, the form value wins.
**Example Configuration**:
```json theme={null}
[
{"metadata_field": "accountNumber", "label": "Account Number", "ago_field": "zendesk_prefill_ticket_field_12345"},
{"jwt_field": "department", "label": "Department", "ago_field": "zendesk_prefill_ticket_field_67890"}
]
```
With this config, a ticket created in Zendesk will have custom field `12345` set to the widget metadata `accountNumber`, and custom field `67890` set to the JWT `department` claim.
#### Allowed Domains
Control which domains can embed the widget:
* Add multiple domains to the allow list
* Leave empty to allow all domains
* Provides CORS protection for your widget
### Widget Display Settings
#### Knowledge Home Page
* **Toggle**: Enable/disable the knowledge home page in the widget
* When enabled, users can browse knowledge articles directly in the widget
* Default: Enabled
### Widget User Permissions
#### Default Permission (Anonymous Users)
* **Selection**: Choose a permission to automatically assign to anonymous widget users
* Applied to users accessing the widget without JWT authentication
* Only one permission can be selected at a time
* Leave unselected if no automatic permission assignment is needed
#### Logged-in Default Permission (Authenticated Users)
* **Selection**: Choose a permission to automatically assign to authenticated widget users
* Applied to users accessing the widget with valid JWT authentication
* Only one permission can be selected at a time
* Takes precedence over the default permission when JWT authentication is present
* Leave unselected if no automatic permission assignment is needed for authenticated users
## Widget Integration
Once configured, the widget can be embedded using the provided HTML examples:
### Basic Integration
```html theme={null}
```
### With a Default Agent
Use `defaultAgent` to route new conversations to a specific agent. Pass the agent's name (as shown in the admin interface):
```html theme={null}
```
If the agent name doesn't match any agent the user has access to, the default agent from the user's permission is used instead.
### With Unread Message Notifications
Enable `notifications` to show a notification bubble above the chat button when a staff member has replied and the user hasn't seen the message yet. The widget polls for unread messages every 30 seconds. The notification only appears for returning users who have a previous chat session.
You can customize the notification message using `notificationMessage` with a `\{\{count\}\}` placeholder for the number of unread messages. The default message is "You have \{\{count}} new message(s)".
```html theme={null}
```
### With User Metadata
```html theme={null}
```
### Vue.js Integration
In a Vue.js application, load the widget script in your `App.vue` (or a layout component) using the `onMounted` lifecycle hook:
```html theme={null}
```
If you need to pass user metadata (for example after login), call `sendMetadataToAGO` once the widget is loaded:
```html theme={null}
```
You can call `sendMetadataToAGO(...)` again later (for example when the user context changes in a SPA). The widget stores the latest value and re-sends it to the chat iframe every time it opens, so the next message always carries the current metadata. If you prefer, you can also mutate `window.AGO.metadata` directly — it will be picked up the next time the widget opens.
### Custom CSS Styling
You can customize the widget appearance by adding CSS rules to your website. The widget uses fixed positioning with the following element IDs:
* `#ago-chat-button` — the chat button (default: `bottom: 20px; right: 20px`)
* `#ago-prompt` — the welcome/notification bubble (default: `bottom: 80px; right: 20px`)
#### Adjusting Widget Position on Mobile
If your website has a bottom navigation bar or toolbar on mobile, you can move the widget button up to avoid overlap:
```html theme={null}
```
Add this `
The Widget & SDK Configuration page allows administrators to manage the AGO widget that can be embedded on external
websites, as well as the SDK API for building custom chat interfaces. Both channels share the same authentication
mechanism: requests are tied to a widget ID and validated against your allowed domains list.
## Accessing Widget & SDK Configuration
Navigate to **Settings → Integrations → Widget & SDK** in the admin panel.
## Features
### Widget Security Settings
#### JWT JWKS URL (Optional)
Configure JWT authentication for added security:
* Set the JWKS URL for JWT token verification
* Leave empty if not using JWT authentication
* Example: `https://your-domain.com/.well-known/jwks.json`
#### JWT Fields Mapping (Optional)
Extract additional information from JWT tokens and include it in ticket private comments:
* Configure which JWT claims to extract and their display labels
* Supports nested fields using dot notation (e.g., `user.department`)
* Extracted fields are automatically added to private comments when tickets are created
* Works with both Zendesk and HelpScout ticketing systems
* Leave empty if no JWT field extraction is needed
**Configuration Format** (JSON array):
```json theme={null}
[
{"jwt_field": "department", "label": "Department"},
{"jwt_field": "employee_id", "label": "Employee ID"},
{"jwt_field": "user.role", "label": "User Role"}
]
```
**Field Mapping Object Structure**:
* `jwt_field` (required): The name of the JWT claim to extract. Supports dot notation for nested fields.
* `label` (required): The display name that will appear in the ticket private comment.
* `ago_field` (optional): Binds the extracted value to a canonical AGO field that can trigger business rules (for example, `zendesk_create_or_update_organization_external_id`).
**How It Works**:
1. When a user authenticates with a JWT token, the system extracts the configured fields from the token
2. Extracted values are stored with the user session
3. When a ticket is created, the extracted fields are automatically appended to the ticket's private comment
4. The private comment will contain each field formatted as: `Label: value`
**Example Use Cases**:
* Track department or team information for internal support
* Include employee/customer IDs for enterprise applications
* Add custom metadata from your authentication system
* Maintain audit trail with user context information
**Supported Field Types**:
* String values (e.g., "IT Department")
* Numeric values (e.g., 12345)
* Boolean values (e.g., true/false)
* Nested objects using dot notation (e.g., `user.profile.department`)
**Example JWT Token**:
```json theme={null}
{
"sub": "user123",
"email": "user@example.com",
"department": "IT",
"employee_id": "EMP123",
"user": {
"role": "admin",
"team": "Engineering"
}
}
```
**Example Configuration**:
```json theme={null}
[
{"jwt_field": "department", "label": "Department"},
{"jwt_field": "employee_id", "label": "Employee ID"},
{"jwt_field": "user.role", "label": "User Role"},
{"jwt_field": "user.team", "label": "Team"}
]
```
**Result in Ticket Private Comment**:
```
Department: IT
Employee ID: EMP123
User Role: admin
Team: Engineering
```
#### Metadata Fields Mapping (Optional)
Extract additional information from widget metadata (sent via `sendMetadataToAGO()`) and include it in ticket private comments:
* Configure which metadata fields to extract and their display labels
* Supports nested fields using dot notation
* Extracted fields are added to private comments when tickets are created
* JWT values take precedence over metadata values when both map to the same AGO field
**Field Mapping Object Structure**:
* `metadata_field` (required): The name of the metadata property to extract. Supports dot notation for nested fields.
* `label` (required): The display name that will appear in the ticket private comment.
* `ago_field` (optional): Binds the extracted value to a canonical AGO field that can trigger business rules.
**Example Configuration**:
```json theme={null}
[
{"metadata_field": "orderId", "label": "Order ID"},
{"metadata_field": "plan", "label": "Plan"},
{"metadata_field": "userId", "label": "User ID", "ago_field": "zendesk_create_or_update_organization_external_id"}
]
```
#### Prefill Zendesk Ticket Fields from Metadata
Use the `zendesk_prefill_ticket_field_` AGO field to populate a Zendesk custom field on ticket creation with a value coming from JWT claims or widget metadata. Replace `` with the numeric ID of the target Zendesk ticket field.
Values resolved from JWT take precedence over widget metadata. If the end user also sets the same field through the ticket form, the form value wins.
**Example Configuration**:
```json theme={null}
[
{"metadata_field": "accountNumber", "label": "Account Number", "ago_field": "zendesk_prefill_ticket_field_12345"},
{"jwt_field": "department", "label": "Department", "ago_field": "zendesk_prefill_ticket_field_67890"}
]
```
With this config, a ticket created in Zendesk will have custom field `12345` set to the widget metadata `accountNumber`, and custom field `67890` set to the JWT `department` claim.
#### Allowed Domains
Control which domains can embed the widget:
* Add multiple domains to the allow list
* Leave empty to allow all domains
* Provides CORS protection for your widget
### Widget Display Settings
#### Knowledge Home Page
* **Toggle**: Enable/disable the knowledge home page in the widget
* When enabled, users can browse knowledge articles directly in the widget
* Default: Enabled
### Widget User Permissions
#### Default Permission (Anonymous Users)
* **Selection**: Choose a permission to automatically assign to anonymous widget users
* Applied to users accessing the widget without JWT authentication
* Only one permission can be selected at a time
* Leave unselected if no automatic permission assignment is needed
#### Logged-in Default Permission (Authenticated Users)
* **Selection**: Choose a permission to automatically assign to authenticated widget users
* Applied to users accessing the widget with valid JWT authentication
* Only one permission can be selected at a time
* Takes precedence over the default permission when JWT authentication is present
* Leave unselected if no automatic permission assignment is needed for authenticated users
## Widget Integration
Once configured, the widget can be embedded using the provided HTML examples:
### Basic Integration
```html theme={null}
```
### With a Default Agent
Use `defaultAgent` to route new conversations to a specific agent. Pass the agent's name (as shown in the admin interface):
```html theme={null}
```
If the agent name doesn't match any agent the user has access to, the default agent from the user's permission is used instead.
### With Unread Message Notifications
Enable `notifications` to show a notification bubble above the chat button when a staff member has replied and the user hasn't seen the message yet. The widget polls for unread messages every 30 seconds. The notification only appears for returning users who have a previous chat session.
You can customize the notification message using `notificationMessage` with a `\{\{count\}\}` placeholder for the number of unread messages. The default message is "You have \{\{count}} new message(s)".
```html theme={null}
```
### With User Metadata
```html theme={null}
```
### Vue.js Integration
In a Vue.js application, load the widget script in your `App.vue` (or a layout component) using the `onMounted` lifecycle hook:
```html theme={null}
```
If you need to pass user metadata (for example after login), call `sendMetadataToAGO` once the widget is loaded:
```html theme={null}
```
You can call `sendMetadataToAGO(...)` again later (for example when the user context changes in a SPA). The widget stores the latest value and re-sends it to the chat iframe every time it opens, so the next message always carries the current metadata. If you prefer, you can also mutate `window.AGO.metadata` directly — it will be picked up the next time the widget opens.
### Custom CSS Styling
You can customize the widget appearance by adding CSS rules to your website. The widget uses fixed positioning with the following element IDs:
* `#ago-chat-button` — the chat button (default: `bottom: 20px; right: 20px`)
* `#ago-prompt` — the welcome/notification bubble (default: `bottom: 80px; right: 20px`)
#### Adjusting Widget Position on Mobile
If your website has a bottom navigation bar or toolbar on mobile, you can move the widget button up to avoid overlap:
```html theme={null}
```
Add this `